
If you are looking for a fun and creative sewing project, this Quilted Strawberry Coaster Tutorial is perfect for you! Right from the first stitch, you’ll enjoy creating a functional and charming coaster that brightens up any table setting. Whether you’re a beginner or an experienced quilter, this step-by-step guide will help you bring your strawberry coaster to life with ease.
In this Quilted Strawberry Coaster Tutorial, we will walk through everything you need to know to make adorable strawberry-shaped coasters. The project is not only a fantastic way to use up fabric scraps but also a delightful gift idea for friends and family. Plus, these coasters can add a touch of handmade charm to your home decor while protecting your surfaces.
Throughout this article, we will focus on best practices for creating your Quilted Strawberry Coaster, including fabric selection, cutting techniques, and quilting tips. Our goal is to ensure you feel confident and inspired to try this delightful sewing project. Let’s dive into the details and get started!
1. Materials and Tools You Will Need
To begin this Quilted Strawberry Coaster Tutorial, let’s gather all the materials and tools you’ll need for a smooth crafting experience. Having everything ready will make your quilting process enjoyable and efficient.
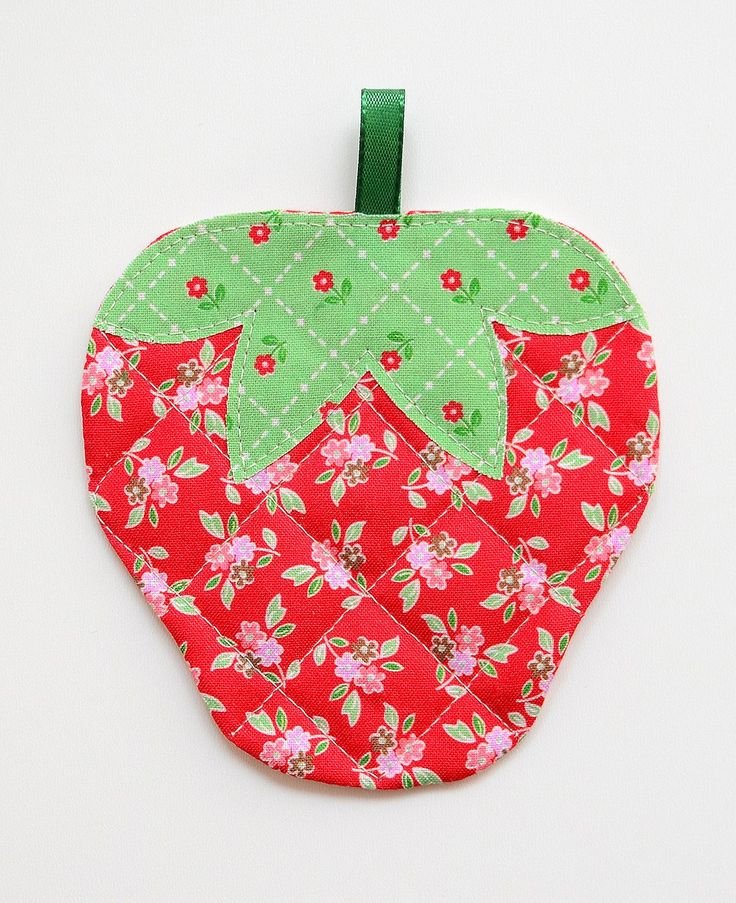
You will need small pieces of red fabric for the strawberry body. Choosing fabric with subtle patterns or dots can add texture and character to your Quilted Strawberry Coaster.
For the leafy top, select a vibrant green fabric. It’s best to use a fabric that contrasts well with the red to make your strawberry design pop on the coaster.
Batting is essential for giving your coaster the right amount of thickness. A lightweight cotton batting works beautifully for this type of small quilting project.
Basic tools include sharp fabric scissors or a rotary cutter, quilting pins, a needle, and red and green thread. If you have a sewing machine, it will speed up the process, but hand sewing is also a great option for this Quilted Strawberry Coaster Tutorial.
A heat-resistant marking pen or chalk will help you draw the strawberry template on your fabric accurately. Don’t forget to have an iron handy for pressing your fabric pieces neatly as you go.
Lastly, you might want to have embellishments like small buttons or embroidery floss if you plan to add little details to your Quilted Strawberry Coaster.
2. Cutting and Preparing Your Fabric Pieces
Now that you have your materials, let’s move to the cutting stage of this Quilted Strawberry Coaster Tutorial. Precision here will make assembling your coaster much easier.
Start by drawing a strawberry shape template on cardboard or thick paper. This will serve as your guide for cutting the red fabric. A coaster-sized strawberry should be about 4 to 5 inches tall.
Place your template on the wrong side of your red fabric and trace it with your marking pen. Carefully cut out the shape, making sure the edges are smooth and even.
Repeat the same tracing and cutting process for the green fabric, but this time create a leafy top pattern. This piece will be placed on top of the red strawberry body.
Cut a piece of batting slightly smaller than your red strawberry shape. This will reduce bulk at the edges when you sew everything together in your Quilted Strawberry Coaster Tutorial.
If you want a double-sided quilted look, cut out a second strawberry shape from your red fabric. This will be the backing of your coaster.
Once all your pieces are cut, iron them to remove wrinkles. Smooth fabric is easier to sew and results in a cleaner finish for your Quilted Strawberry Coaster.
3. Assembling and Quilting Your Coaster
It’s time to put everything together and start quilting in this Quilted Strawberry Coaster Tutorial. This is where your project really starts to take shape.
Layer your fabric pieces: place the backing piece right side down, then the batting, and finally the front strawberry piece with the leafy top attached. Pin everything securely to prevent shifting.
Start quilting by stitching the green leafy top onto the red strawberry shape. You can use a straight stitch or a decorative stitch if you want to add extra flair to your Quilted Strawberry Coaster.
Quilt lines on the strawberry body can be simple straight lines or playful curved lines to mimic the texture of a real strawberry. Keep your stitches even for a polished look.
If hand quilting, use small, consistent stitches. This not only looks beautiful but also ensures your Quilted Strawberry Coaster is durable and long-lasting.
Once quilting is complete, sew around the edge of your coaster using a 1/8-inch seam allowance. This closes the layers together and finishes the piece nicely.
Trim any excess batting or fabric at the edges and give your coaster one final press with the iron to set the stitches and flatten the quilted texture.
4. Finishing Touches and Care Tips
The final step in this Quilted Strawberry Coaster Tutorial is adding any decorative elements and learning how to care for your handmade coaster.
You might want to sew on small black buttons or add embroidered seed shapes to give your coaster a realistic strawberry look. These small details add charm and personality.
Another option is to add a hanging loop to your Quilted Strawberry Coaster, so it can double as a kitchen decoration when not in use.
If you prefer a cleaner look, you can skip embellishments and let the quilting and fabric speak for themselves. The beauty of this project is its flexibility to suit your taste.
To care for your Quilted Strawberry Coaster, gently hand wash it in cool water and lay it flat to dry. This will preserve its shape and keep it looking fresh.
Avoid using bleach or harsh detergents, as these can damage the fabric and stitching. Treat your coaster as you would any handmade quilted item.
Consider making a set of Quilted Strawberry Coasters to give as gifts or to use for family gatherings. They’re a sweet addition to any table setting!
FAQ
Can beginners make this Quilted Strawberry Coaster?
Yes! This Quilted Strawberry Coaster Tutorial is beginner-friendly. The steps are simple, and the project is small enough to complete in a short amount of time.
Do I need a sewing machine for this project?
No, you can hand sew your Quilted Strawberry Coaster if you prefer. A sewing machine can speed up the process, but hand stitching gives a charming handmade feel.
What type of batting is best for quilted coasters?
Lightweight cotton batting works best for this Quilted Strawberry Coaster Tutorial. It provides the right thickness without making the coaster too bulky.
Can I use felt for the leafy top?
Yes, felt can be used for the green leafy top. It’s easy to cut and doesn’t fray, making it a great option for this Quilted Strawberry Coaster Tutorial.
How can I make my coaster heat-resistant?
Consider using insulated batting designed for pot holders if you want your Quilted Strawberry Coaster to offer extra protection against heat.
Can I wash these coasters in the washing machine?
It’s best to hand wash your Quilted Strawberry Coaster to maintain its shape and detail, especially if you’ve added embellishments.
PATTERN HERE
This Quilted Strawberry Coaster Tutorial has guided you through creating a beautiful, functional, and fun sewing project. From selecting your fabrics to adding final details, you now have all the knowledge needed to make your own strawberry coasters. I hope this tutorial has inspired you to try quilting or add a new project to your crafting list. Please leave a sincere opinion or share suggestions on how we can make future tutorials even better. Happy quilting!