
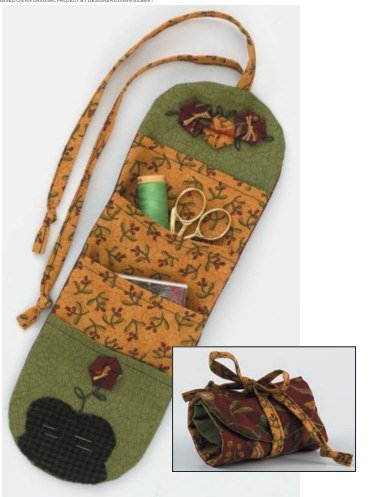
If you’re looking for the perfect way to keep your sewing tools neat and accessible, this Sewing Roll FREE PATTERN is just what you need. Designed for sewists of all levels, a sewing roll is a practical and portable solution for organizing needles, scissors, thread spools, and more. With this free pattern, you can create your own stylish and functional accessory while expressing your creativity through fabric and stitches.
Whether you sew occasionally or every day, keeping your tools in one place can make a huge difference. The Sewing Roll FREE PATTERN allows you to customize the size, number of pockets, and fabric, making it ideal for your specific needs. Plus, it’s a great way to use up fabric scraps or show off your favorite prints. Not only does it help keep things tidy, but it also adds charm to your sewing station or travel bag.
Best of all, this project is beginner-friendly! You don’t need to be a professional seamstress to follow this pattern. With step-by-step instructions and simple materials, anyone can create a sewing roll that is both beautiful and practical. In this guide, we’ll explore the benefits of a sewing roll, how to make one using this free pattern, customization tips, and how to care for your finished product.
1. Why You Need a Sewing Roll
One of the biggest benefits of using a sewing roll is organization. It provides compartments to neatly store all your essential sewing tools. This keeps your workspace clutter-free and saves time when searching for specific items.
The portability of a sewing roll is another major advantage. Unlike bulky storage boxes, a sewing roll is compact and easy to carry, making it perfect for taking to sewing classes, meet-ups, or while traveling.
Creating your own with the Sewing Roll FREE PATTERN means you can tailor it to your exact needs. Add more pockets, a zipper, or even elastic loops for added functionality. This customization ensures that your sewing roll works for you and not the other way around.
Another key point is the protective aspect. Tools like scissors and needles can damage other items if left loose. A sewing roll keeps them safely tucked away, minimizing wear and preventing accidental pricks or damage.
Besides functionality, a handmade sewing roll reflects your personal style. Choose fun, bold, or elegant fabrics that speak to you. The pattern is a blank canvas for your creativity.
Lastly, it’s a fun and satisfying sewing project. Whether you’re a novice or experienced maker, finishing your sewing roll will leave you with a useful tool and a sense of accomplishment.
2. Materials Needed for the Sewing Roll FREE PATTERN
To begin your project, you don’t need expensive supplies. Basic materials will do the trick. You’ll need fabric (cotton works best), interfacing, thread, scissors, pins, and your sewing machine. Optional extras include bias tape, buttons, or elastic bands.
Choose your outer and lining fabric thoughtfully. The outer fabric should be sturdy, while the inner can be a lighter cotton or quilting fabric. Match the fabrics for both style and function.
Interfacing adds structure to your sewing roll. It ensures that your tool organizer is firm and holds its shape over time. Lightweight fusible interfacing works well for most patterns.
You’ll also need a good pair of fabric scissors or rotary cutter to ensure clean edges. Accurate cutting is essential for professional-looking results, so take your time in this step.
Use quality thread that matches or complements your fabric. Polyester thread is durable and easy to work with. Consider double stitching key seams to add extra strength.
A printed version of the Sewing Roll FREE PATTERN will help guide your work. If the pattern includes measurements instead of printable templates, use a ruler or quilting grid for accuracy.
3. Step-by-Step Instructions to Create Your Sewing Roll
Begin by cutting out all the fabric pieces as outlined in the Sewing Roll FREE PATTERN. Typically, you’ll need a main piece for the outer layer, a lining piece, and several pocket pieces.
Next, iron the interfacing onto the wrong side of your outer fabric. This stabilizes the sewing roll and helps it retain structure. Be sure to press, not glide, to avoid bubbles or distortion.
Arrange the pocket layers on the lining piece, folding and pressing each edge neatly. Stitch along the bottom edges first, then divide into sections by sewing vertical lines to create compartments.
Once the pockets are sewn, place the lining and outer fabric right sides together. Pin all around, leaving a small opening for turning. Stitch with a ¼” seam allowance.
Clip the corners for cleaner edges, then turn your sewing roll right side out through the opening. Use a chopstick or pencil to push out the corners neatly. Press flat and topstitch around the edge to close the opening and secure the seams.
Add closures like a ribbon, snap, or button to keep the roll closed when not in use. This is both practical and adds a decorative touch. Your Sewing Roll FREE PATTERN project is now complete!
4. Creative Ways to Customize Your Sewing Roll
Customization is one of the best parts of using a Sewing Roll FREE PATTERN. It allows you to adapt the design to match your personal style and needs. You can choose vibrant colors or elegant tones to reflect your personality.
You may want to add labels to each pocket, using embroidery or fabric pens. This helps quickly identify each tool and keeps things orderly. It’s especially helpful if you carry lots of small items.
Consider using waterproof fabric for the lining to protect your tools from moisture. This is a smart idea if you often take your sewing roll on the go or store it near liquids.
Add a pincushion section for easy access to pins and needles. You can stuff a small section with fiberfill and sew it securely into one pocket. This small addition adds great value to your sewing roll.
Another great tip is incorporating recycled materials. Use leftover fabric scraps or repurpose old clothes to make your sewing roll eco-friendly. This not only saves money but also supports sustainability.
Lastly, you can personalize the sewing roll with your initials, tags, or decorative stitching. Make it truly yours and turn this free pattern into a work of art you’ll love using every day.
FAQ – Sewing Roll FREE PATTERN
What is a sewing roll used for?
A sewing roll is a fabric organizer that holds sewing tools like scissors, thread, needles, and measuring tape. It rolls up neatly for storage or travel.
Is the Sewing Roll FREE PATTERN suitable for beginners?
Yes! The Sewing Roll FREE PATTERN is beginner-friendly with simple steps and easy-to-follow instructions. It’s a great first sewing project.
What fabric is best for making a sewing roll?
Cotton or quilting fabric works best. Use a sturdier fabric for the outer layer and a softer, lighter one for the lining. Interfacing is recommended for added support.
How can I close the sewing roll securely?
You can use ribbon ties, Velcro, snaps, or buttons. Choose a closure based on personal preference and convenience.
Can I adjust the size of the sewing roll?
Absolutely. The beauty of the Sewing Roll FREE PATTERN is that it’s customizable. You can adjust the dimensions, pocket sizes, and layout to fit your specific tools.
How do I care for my finished sewing roll?
Most sewing rolls can be gently hand-washed or machine-washed on a delicate cycle. Avoid high heat when drying to maintain the fabric and stitching.
PDF HERE
Creating your own Sewing Roll FREE PATTERN is a rewarding and useful sewing project. You’ve learned about its purpose, materials, construction process, and creative customization options. With just a bit of time and fabric, you can make a practical accessory that will keep your sewing tools neat and accessible.
We hope this guide inspired you to start your own sewing roll project. If you’ve tried this pattern or have tips to share, please leave your honest feedback and suggestions below. We’d love to hear from fellow sewing enthusiasts and continue improving together!