
The Sisterhood Sampler Block 8 is a stunning and meaningful addition to the Sisterhood Sampler quilt series, embodying not only creativity but also the spirit of unity and collaboration among quilters. Whether you’re a seasoned quilter or just beginning your journey, Block 8 offers a unique blend of design and technique that keeps your quilting experience engaging and rewarding.
In this article, we’ll explore the beauty of Sisterhood Sampler Block 8 and how you can master its creation step by step. You’ll discover tips for selecting fabrics, piecing the block with precision, and ensuring your finished work complements the rest of your sampler quilt. Let’s dive into this vibrant world of quilting and celebrate the sisterhood that unites us through every stitch.
The Sisterhood Sampler Block 8 not only enhances your quilt’s aesthetic appeal but also symbolizes the bonds of friendship and shared creativity. Let’s break down everything you need to know, from fabric choices to the final assembly.
1. Understanding the Design of Sisterhood Sampler Block 8
The design of Sisterhood Sampler Block 8 is both intricate and captivating, making it a standout piece within the sampler quilt series.
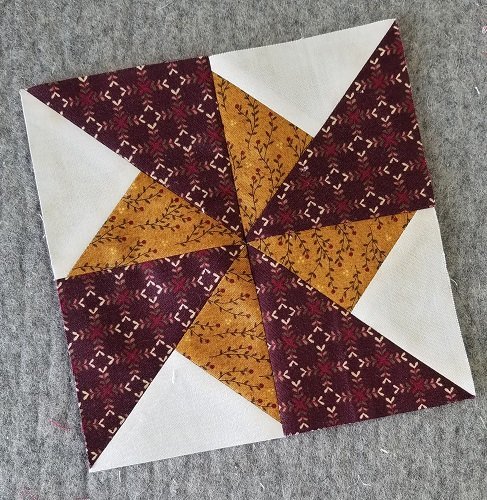
- Symmetry and Balance: This block often features symmetrical patterns that add visual harmony to your quilt. Understanding the balance within the design helps create a cohesive look.
- Color Play: Choosing complementary colors enhances the vibrancy of the block. Consider using contrasting hues to highlight the pattern.
- Geometric Elements: Triangles, squares, and other geometric shapes form the core of Sisterhood Sampler Block 8. Precision in cutting and sewing these shapes is crucial.
- Focal Point: The center of the block often serves as a focal point, drawing the eye towards the heart of the design. Emphasize this area with bold colors or detailed stitching.
- Seam Allowances: Maintaining consistent seam allowances ensures the pieces fit perfectly together. This is key to achieving a polished look.
- Versatility: The design allows for creativity, so feel free to add your personal touch by experimenting with different fabrics or stitch patterns.
2. Fabric Selection Tips for Sisterhood Sampler Block 8
Choosing the right fabrics is essential to bring Sisterhood Sampler Block 8 to life.
- Color Palette: Opt for a cohesive color palette that complements your overall quilt. Soft pastels, bold primaries, or earthy tones all work beautifully.
- Fabric Quality: Use high-quality cotton fabrics to ensure durability and ease of stitching. Cheap fabrics may fray or distort the design.
- Pattern Mixing: Don’t be afraid to mix solids with prints. Just ensure the patterns don’t clash — balance is key.
- Contrast and Depth: Incorporate both light and dark shades to create depth and dimension within Sisterhood Sampler Block 8.
- Pre-washing: Always pre-wash your fabrics to prevent shrinkage later. This step keeps your quilt block the correct size.
- Scrap Utilization: Consider using fabric scraps from previous blocks to maintain consistency across the sampler quilt.
3. Step-by-Step Assembly of Sisterhood Sampler Block 8
Now that you have your fabrics ready, let’s piece together the Sisterhood Sampler Block 8 with precision.
- Cutting the Pieces: Begin by cutting all fabric pieces according to the pattern dimensions. Use a rotary cutter and ruler for accuracy.
- Arranging the Layout: Lay out all pieces before sewing to ensure the design aligns correctly. Adjust any misplacements.
- Sewing the Sections: Start sewing small sections together, pressing seams open to reduce bulk.
- Joining the Rows: Assemble rows one at a time, ensuring edges match perfectly for a seamless look.
- Checking Measurements: After each step, double-check measurements. A small mistake can affect the entire block.
- Final Pressing: Once assembled, give the block a final press with an iron to flatten seams and crisp up the design.
4. Common Mistakes and How to Avoid Them in Sisterhood Sampler Block 8
Even experienced quilters can encounter challenges when working on Sisterhood Sampler Block 8. Here’s how to avoid common pitfalls.
- Inaccurate Cutting: Always use a sharp rotary cutter and a quilting ruler. Double-check measurements before cutting.
- Uneven Seams: Ensure you consistently use a quarter-inch seam allowance throughout the process.
- Skipping Pressing: Pressing seams after each step prevents fabric distortion and helps align pieces perfectly.
- Color Clash: Lay out fabrics beforehand to visualize how colors interact. Adjust before sewing.
- Ignoring Pattern Directions: Follow pattern instructions closely. Skipping steps can lead to design errors.
- Rushing the Process: Take your time. Precision is more important than speed when assembling Sisterhood Sampler Block 8.
FAQ: Sisterhood Sampler Block 8
Q: What is the size of Sisterhood Sampler Block 8?
A: The size can vary, but most blocks follow standard sampler quilt dimensions. Always check your pattern for exact measurements.
Q: Can I use different fabrics for Sisterhood Sampler Block 8?
A: Absolutely! While consistency helps, adding unique fabrics personalizes your quilt.
Q: How do I ensure my seams are accurate?
A: Use a quarter-inch foot on your sewing machine and measure frequently.
Q: What if my block turns out too small?
A: This usually happens due to small seam allowances. Check your measurements and adjust accordingly.
Q: Is Sisterhood Sampler Block 8 suitable for beginners?
A: Yes! With careful attention to detail, beginners can master this block.
Q: How do I add my personal touch to the block?
A: Experiment with unique fabric combinations, decorative stitching, or added embroidery.
PATTERN HERE
Mastering Sisterhood Sampler Block 8 is both a creative and rewarding experience. With the right fabrics, careful assembly, and attention to detail, you can create a beautiful quilt block that celebrates both artistry and the bonds of sisterhood. Whether you’re new to quilting or a seasoned pro, this block adds depth and charm to your sampler quilt.
I’d love to hear your thoughts! Have you tried making Sisterhood Sampler Block 8? Share your experience in the comments below, and feel free to offer any tips or suggestions. Happy quilting!