
Creating a Starburst Quilt is a rewarding and creative experience, perfect for quilters of all skill levels. This Starburst Quilt Tutorial will guide you through each step of the process, from selecting fabrics to piecing together the intricate design.
Whether you’re a beginner or a seasoned quilter, this project offers a unique opportunity to craft a stunning piece that showcases your talent and style. Let’s dive into this exciting journey!
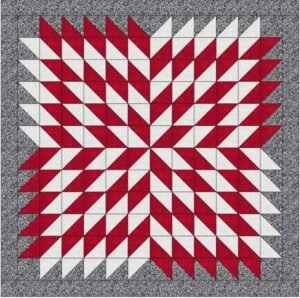
Quilting has long been a cherished art form, combining functionality with creative expression. The Starburst Quilt pattern is particularly popular due to its striking geometric design and versatility. It’s a fantastic way to use vibrant colors and contrasting tones to create a visually stunning effect.
Before you begin, it’s essential to gather all the necessary materials and understand the techniques involved. In this tutorial, we’ll break down the process into manageable steps, ensuring you can confidently complete your quilt and enjoy the journey along the way.
1. Choosing the Right Materials and Tools
The foundation of any great quilt begins with the right materials and tools. Here’s what you’ll need:
- Fabric Selection: For the Starburst Quilt, opt for high-quality cotton fabrics. Choose a mix of bold colors and subtle neutrals to create a balanced and eye-catching design. Pre-cut fabric bundles like fat quarters are ideal for this project.
- Quilting Tools: Invest in essential tools such as a rotary cutter, cutting mat, quilting ruler, and sharp sewing scissors. These tools ensure precision and make the process much smoother.
- Thread and Needles: Use durable, high-quality thread that complements your fabric colors. Quilting needles are recommended for both machine and hand sewing.
- Batting and Backing Fabric: Select a soft and lightweight batting for a comfortable quilt. For the backing, choose a fabric that complements the front design.
- Iron and Pressing Tools: An iron is crucial for pressing seams and ensuring crisp, clean lines throughout your quilt.
- Sewing Machine: While a basic sewing machine works, a machine with quilting features can be a significant advantage.
2. Designing and Cutting the Starburst Pattern
The Starburst pattern is the heart of this quilt, and precision is key to achieving its stunning geometric look. Follow these steps:
- Create a Template: Use graph paper or printable templates to map out your Starburst design. This ensures accuracy and helps visualize the final result.
- Cutting Fabrics: Use your rotary cutter and quilting ruler to cut fabric pieces according to the template. Ensure all pieces are symmetrical and uniform in size.
- Color Coordination: Arrange your fabric pieces to experiment with color placement. Aim for a harmonious blend of bold and neutral tones.
- Label Pieces: Label each fabric piece to stay organized during assembly. This step prevents confusion and saves time later.
- Seam Allowance: Remember to account for seam allowances, typically 1/4 inch, in your measurements.
- Prepping the Work Area: Set up a clean, spacious area for cutting and organizing your fabric pieces. This minimizes mistakes and enhances efficiency.
3. Piecing Together the Quilt Top
Now that your fabric pieces are ready, it’s time to assemble the quilt top. Here’s how:
- Lay Out the Design: Arrange all fabric pieces on a flat surface to confirm the placement and design. Adjust as needed before sewing.
- Start Small: Begin by sewing smaller sections of the design together. Work systematically, completing each segment before moving to the next.
- Use Chain Piecing: For efficiency, use the chain piecing technique, which involves sewing multiple pieces in a continuous line without cutting the thread.
- Press Seams: Press each seam flat as you sew to maintain a clean and professional finish. Use an iron set to the appropriate temperature for your fabric.
- Join Sections: Once smaller sections are complete, sew them together to form the larger quilt top. Align seams carefully for a polished look.
- Final Check: Inspect the quilt top for any gaps or misaligned seams. Make necessary adjustments before proceeding to the next step.
4. Quilting and Finishing Touches
The final stage brings your Starburst Quilt to life. Follow these steps to complete your masterpiece:
- Layering: Create the quilt sandwich by layering the backing fabric, batting, and quilt top. Smooth out any wrinkles for an even finish.
- Basting: Secure the layers together using quilting pins, spray adhesive, or basting stitches. This prevents shifting during quilting.
- Quilting Patterns: Choose a quilting pattern that complements the Starburst design. Straight-line or free-motion quilting are popular choices.
- Binding the Edges: Prepare and attach the binding to the edges of the quilt. Mitered corners create a neat and professional finish.
- Final Pressing: Give your quilt a final press to enhance its appearance and ensure all seams lie flat.
- Inspect and Display: Examine your quilt for any loose threads or imperfections. Once satisfied, your Starburst Quilt is ready to be displayed or gifted!
FAQ About Starburst Quilts
Q: What is the best fabric for a Starburst Quilt? A: High-quality cotton fabric is ideal due to its durability, ease of handling, and vibrant color options.
Q: Can beginners make a Starburst Quilt? A: Absolutely! While the design may look complex, breaking it into smaller steps makes it manageable for beginners.
Q: How do I maintain my Starburst Quilt? A: Wash your quilt gently in cold water with mild detergent. Air drying is recommended to preserve its quality.
Q: What size should my Starburst Quilt be? A: The size depends on your preference. Common sizes range from lap quilts to bed-sized quilts.
Q: Can I hand-sew the Starburst Quilt? A: Yes, although it’s more time-consuming, hand-sewing is a traditional method that adds a personal touch.
Q: How long does it take to complete a Starburst Quilt? A: The time varies based on your skill level and the quilt size. On average, it may take a few weeks to complete.
PATTERN HERE
This Starburst Quilt Tutorial provides a comprehensive guide to creating a quilt that is as stunning as it is meaningful. From selecting materials to adding the final touches, every step is an opportunity to unleash your creativity and craft something truly special.
We hope this tutorial inspires you to start your quilting journey and embrace the art of creating. If you found this guide helpful, we’d love to hear your thoughts and suggestions. Leave a comment below with your feedback and share your quilting experience with us!