
If you’re looking to create something both visually striking and historically rich, this Yankee Puzzle Quilt Block Tutorial: FREE PATTERN is exactly what you need. Right from the first stitch, this pattern invites quilters to explore a timeless design that combines simplicity with complexity in an eye-catching way. In this article, we’ll walk you through every detail you need to craft this captivating quilt block while staying within Google AdSense content policies.
The Yankee Puzzle quilt block is rooted in American quilting tradition. Its geometric design reflects the ingenuity and resourcefulness of early quilters who used leftover fabric scraps to create beautiful and functional pieces. Today, modern quilters continue to embrace this design for its balance, symmetry, and charm. Whether you’re a beginner or experienced in quilting, this free pattern will make the process enjoyable and satisfying.
We’ll explore each step of the Yankee Puzzle Quilt Block Tutorial: FREE PATTERN with clear instructions, ensuring your quilt block turns out beautifully. This guide also emphasizes the importance of layout, color choice, and precise cutting. With practice, you’ll gain confidence in crafting a full quilt using this block. Let’s begin your quilting journey with one of the most iconic and rewarding blocks in quilting history
1. Understanding the Yankee Puzzle Quilt Block
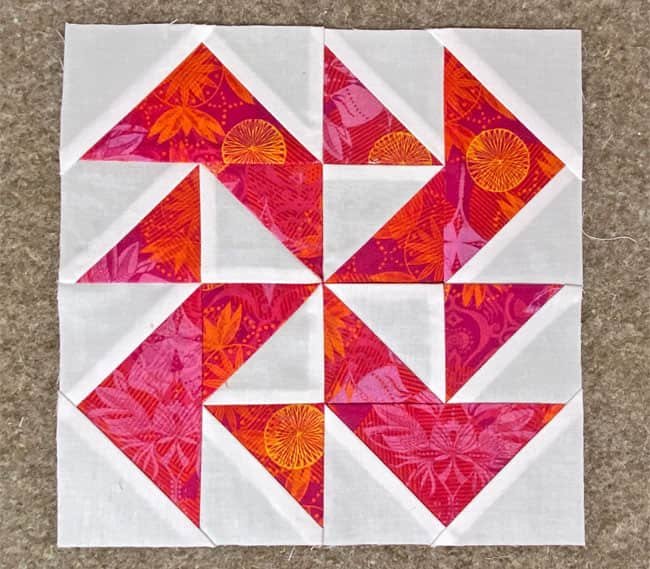
The Yankee Puzzle quilt block is a classic example of how simple triangles can create a complex-looking design. At first glance, it may seem intricate, but it’s primarily composed of half-square triangles (HSTs) arranged strategically to create a twisting motion.
This pattern dates back to the 19th century, often associated with stories from the American Northeast. Its strong visual direction symbolizes change, movement, and progress—elements that quilters often incorporated intentionally into their work.
Each block is typically made up of four smaller squares, each divided diagonally to form two triangles. By rotating and aligning these triangles in specific ways, the distinctive “twist” of the puzzle begins to appear.
When making a quilt with this pattern, consistent seam allowances and accurate cutting are essential. Without precision, the alignment of the triangles could be off, disrupting the symmetry of the overall design.
The versatility of the Yankee Puzzle block means you can use it in both traditional and modern quilt projects. It works beautifully in scrap quilts, using various fabric remnants, or in a color-controlled layout for a more contemporary feel.
For those new to quilting, this Yankee Puzzle Quilt Block Tutorial: FREE PATTERN will make it easier to follow each step without feeling overwhelmed. With patience and attention to detail, the block comes together seamlessly.
2. Materials and Cutting Instructions
Before diving into sewing, it’s important to gather your materials. For this Yankee Puzzle block tutorial, you’ll need basic quilting supplies: a rotary cutter, cutting mat, quilting ruler, fabric squares, and a sewing machine.
Choose two contrasting fabrics for the best visual impact. Traditional versions of this block often used navy and white or red and cream combinations. However, you can modernize the look with vibrant or pastel tones.
To make one block, cut the following:
- (4) 4.5” squares from Fabric A
- (4) 4.5” squares from Fabric B
You will use these to create (8) 4” finished HSTs after sewing and trimming.
Place one square from Fabric A right sides together with one from Fabric B. Draw a diagonal line across the back of one square, sew a quarter-inch on either side of the line, and cut down the center to create two HSTs.
Press your HSTs with seams open or to the darker side, depending on your preference. Consistency here will help with accurate alignment during assembly.
After pressing, trim all HSTs to 4” square to ensure they fit together perfectly. Lay out the pieces before sewing to visualize how the puzzle effect will look once completed.
This Yankee Puzzle Quilt Block Tutorial: FREE PATTERN relies heavily on preparation. Taking time at this stage guarantees smoother sewing and a more polished result.
3. Assembling the Quilt Block Step-by-Step
Now that your pieces are ready, it’s time to assemble the block. Begin by organizing your HSTs into the correct layout. This pattern forms a rotational motion, so orientation matters significantly.
Start with one quadrant of the block, aligning the triangles to form a right-angle shape pointing inward. Each quadrant should mirror or rotate around a central axis to create the “puzzle” illusion.
Sew each quadrant together in two rows. Use pins at intersections to maintain sharp points and alignment. Once all four quadrants are sewn, press them well.
Next, assemble the quadrants into a larger 2×2 grid. Match seams carefully, using nesting or open seams depending on your earlier pressing method.
Sew the two top quadrants together, then the two bottom ones. Press these seams and sew the final horizontal seam to complete your block.
Once your block is complete, measure to ensure it’s square and the correct size—typically 8.5” unfinished or 8” finished. Trim carefully if necessary, keeping edges straight.
Following this Yankee Puzzle Quilt Block Tutorial: FREE PATTERN, your block should now resemble the classic twisting motion that defines the Yankee Puzzle pattern. It’s satisfying to see it come together!
4. Tips for Creating a Full Yankee Puzzle Quilt
Now that you’ve mastered the block, it’s time to think bigger! To create a full quilt, decide how many blocks you want. A baby quilt might use 16 blocks (4×4), while a throw or bed-size quilt will need more.
Choose a consistent fabric scheme or make each block scrappy for a more eclectic look. Either way, sticking to high contrast will preserve the puzzle effect throughout the quilt.
When arranging blocks in a full quilt, alternate the orientation to enhance the motion or keep them aligned for a more unified design. Play with layouts on a design wall or use digital quilt software.
Add sashing or borders to create space between blocks if desired. This can help each block stand out and add structure to the overall composition.
Quilt as desired—this pattern pairs well with both straight-line quilting and free-motion designs. Consider echo quilting around the puzzle shapes to emphasize movement.
Finish with a binding that complements your fabric choices. A darker or contrasting binding can frame your quilt beautifully, making your work look even more polished and intentional.
Frequently Asked Questions (FAQ)
What size is a standard Yankee Puzzle quilt block?
Most commonly, the Yankee Puzzle block finishes at 8” or 12” square. However, the size can be adjusted by scaling the starting squares for the HSTs.
Can I use precut fabric for this pattern?
Yes! Precut 5” squares (charm packs) are great for making HSTs. Just trim them down after sewing to achieve the correct size.
Is this pattern suitable for beginners?
Absolutely. This Yankee Puzzle Quilt Block Tutorial: FREE PATTERN breaks down each step clearly. Beginners can follow along with confidence.
What type of fabric works best?
100% cotton quilting fabric is recommended for best results. Choose contrasting colors or prints to highlight the twisting motion of the block.
How can I make my points match perfectly?
Accurate cutting, consistent seam allowances, and careful pressing are the keys. Use pins or clips at seam intersections and slow down when sewing.
Can I make this block using only hand sewing?
Yes, it is possible to sew this block by hand using a running stitch. It will take more time, but the results can be just as precise and beautiful.
PATTERN HERE
This Yankee Puzzle Quilt Block Tutorial: FREE PATTERN provides all the guidance you need to bring this timeless quilt block to life. From cutting fabric to piecing together a stunning full quilt, each section offers step-by-step advice to help you succeed.
The Yankee Puzzle block is perfect for quilters who want a bold, geometric design that’s both classic and flexible. Whether you’re creating a one-block wall hanging or a full-size quilt, this pattern will give your project a dynamic and artistic finish.
We hope you found this guide helpful! Please leave a sincere opinion or suggestion in the comments section. Your feedback helps us continue to provide valuable and inspiring quilt tutorials. Happy quilting!