
Crochet Wave Stitch Pattern is a beautiful and versatile technique that creates a flowing, curved texture with a playful handmade appearance. The design shown in the inspiration image uses soft shades of blue and white arranged into repeating waves, creating a decorative effect that can be adapted for many crochet projects.
The gentle curves make this stitch especially attractive for accessories, ornaments, bracelets, bag charms, keychains, trims, and other small handmade pieces. It is also a wonderful way to practice consistent tension while learning how crochet stitches can be shaped into decorative forms.
One of the best things about this Crochet Wave Stitch Pattern is that it can be customized easily. You can work with one color for a simple and elegant result, or combine several colors to emphasize each wave. Blue, white, cream, pastel shades, and contrasting tones can all produce completely different visual effects.
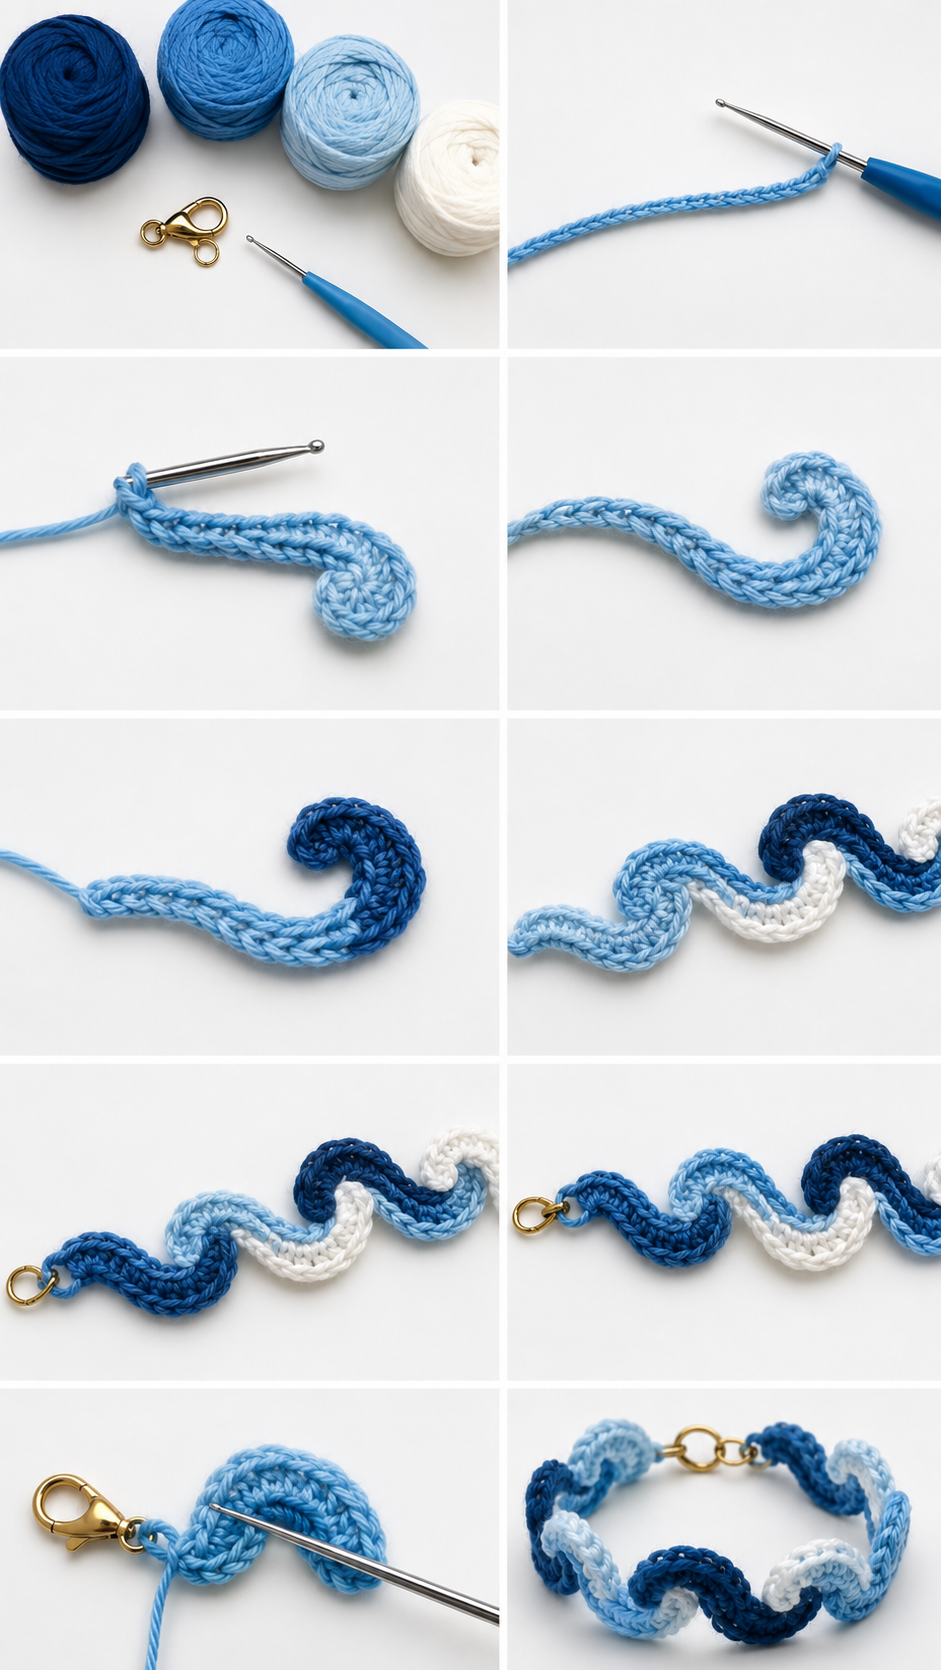
The pattern can also be made with different yarn weights, although smooth medium-weight cotton yarn is particularly easy to control when you are learning the technique. With a suitable crochet hook, a small amount of yarn, and a little patience, you can create a charming wave design without complicated equipment.
This tutorial explains a practical, photo-inspired way to make a Crochet Wave Stitch Pattern step by step. The goal is to understand the construction of the curved sections, maintain even tension, and connect multiple waves into a continuous decorative piece. Because crochet tension and yarn thickness vary from person to person, you may need to adjust the number of chains or stitches slightly to achieve the exact size you want. The most important part is understanding the rhythm of the pattern so you can reproduce the waves confidently and adapt them to your own creative projects.
1. Materials and Understanding the Crochet Wave Stitch Pattern
Before beginning the Crochet Wave Stitch Pattern, gather a few basic supplies. You will need smooth crochet yarn, a crochet hook appropriate for your yarn, scissors, and a yarn needle for finishing the ends. If you want to reproduce the multicolor appearance shown in the inspiration image, prepare three shades, such as light blue, dark blue, and white. Cotton yarn works particularly well because it creates defined stitches and holds the shape of the waves nicely.
For a small decorative project, a medium or light-weight yarn is a good choice. A hook around 3.0 mm to 4.0 mm can work well with many cotton yarns, but always check the yarn label and consider making a small test section first. The goal is to create stitches that are firm enough to hold the curves but not so tight that the crochet becomes difficult to manipulate.
The basic stitches used in this Crochet Wave Stitch Pattern are beginner-friendly. You should be comfortable with a slip knot, chain stitch, slip stitch, single crochet, and, if desired, half double crochet. These stitches can be combined to create increases and decreases that encourage the fabric to move upward and downward, producing the characteristic wave.
Begin with a foundation chain. For a small wave, you can start with approximately 12 to 16 chains and experiment with the number until the curve has the proportions you prefer. Keep your chains relatively even because inconsistent foundation tension can make one side of the wave look tighter than the other.
A useful way to understand the design is to think of each wave as having three stages: the rise, the center curve, and the return. The stitches gradually increase or become taller as the crochet moves toward the top of the wave, and then the stitch placement changes to bring the work back downward. This rhythmic movement is what gives the Crochet Wave Stitch Pattern its flowing appearance.
For beginners, it is helpful to practice one wave before connecting several waves together. Do not worry if your first attempt looks slightly different from the example. Crochet is affected by yarn, hook size, tension, and individual stitching style. Once you understand how the curved section is formed, repeating the design becomes much easier.
2. Step-by-Step Crochet Wave Stitch Pattern
Start by making a slip knot and placing it on your crochet hook. Make a foundation chain of approximately 14 stitches for a small decorative wave. Keep the chain relaxed but not loose. Count your stitches carefully because the foundation chain establishes the length of your first section.
For the first working section, insert your hook into the appropriate chain and begin working single crochet stitches. If you want a more pronounced wave, you can gradually introduce increases by working two stitches into selected chain spaces. This creates additional fullness and encourages the crochet to curve outward.
Continue across the foundation while maintaining the same basic rhythm. When you reach the area where you want the wave to rise, work your selected increase stitches. These additional stitches create the rounded section visible in a Crochet Wave Stitch Pattern. Try to keep the tension consistent so the curve develops naturally instead of becoming stiff.
Once the highest point of the wave has been reached, begin shaping the return section. You can use decreases or tighter stitch placement to bring the crochet back toward its original line. The transition should be gradual rather than abrupt. A smooth transition is one of the main characteristics that makes the finished wave look polished.
After completing the first wave, examine the shape before continuing. If the curve is too shallow, you can add a few more stitches to the rising portion on your next attempt. If it curls too strongly, reduce the number of increases or loosen your tension slightly. This flexibility makes the Crochet Wave Stitch Pattern useful for customized projects.
To create a longer decorative strip, repeat the same wave sequence several times. When working multiple colors, finish one section neatly before introducing the next color. For the design shown in the inspiration image, alternating light blue, dark blue, and white creates a beautiful layered effect. You can also use two colors for a more coordinated appearance.
3. Joining the Waves and Creating the Decorative Shape
Once you have made the first wave, the next step is to create another section that connects naturally with it. The joining point should be secure but flexible. A slip stitch is useful for connecting small crochet sections because it creates a neat connection without adding much bulk.
When changing colors, carefully pull the new yarn through the final loop of the previous section. Leave a small yarn tail that can later be woven into the stitches. Avoid leaving extremely short ends because they may loosen during handling. Proper finishing is particularly important for small projects that will be moved or carried frequently.
As you add the second wave, pay attention to the direction of the curve. The inspiration image shows a flowing pattern in which the waves alternate between rising and dipping sections. Repeating this movement creates a visual rhythm that makes the finished crochet look more dynamic than a straight strip.
You can make the waves relatively loose for a soft, decorative effect or tighter for a more compact design. If your project will be used as a bracelet, bag accessory, or keychain, slightly firmer stitches can help the piece maintain its shape. If you are making a decorative trim, a softer tension may create a more relaxed appearance.
One interesting feature of the Crochet Wave Stitch Pattern is that the same basic idea can be adapted into different sizes. Larger waves can be created by using more foundation chains and additional shaping stitches. Smaller waves are ideal for charms, ornaments, narrow trims, and miniature crochet accessories.
Continue repeating the wave sequence until your piece reaches the desired length. Periodically place the project on a flat surface and look at the overall shape. This simple check helps you notice if your tension is changing or if one wave is becoming significantly larger than another.
4. Finishing the Crochet Wave Stitch Pattern and Project Ideas
When the final wave is complete, fasten off the yarn securely. Cut the yarn, leaving a tail of several inches. Use a yarn needle to weave the end through the back of several stitches. Move the needle in different directions through the fabric so the yarn becomes securely anchored without creating a visible knot.
If you are creating a small accessory similar to the inspiration image, you can attach a small metal clasp or keychain finding to the finished crochet. Position the hardware at a strong section of the crochet rather than attaching it to a single loose stitch. This helps distribute tension more evenly when the finished piece is handled.
Another option is to turn the Crochet Wave Stitch Pattern into a bracelet or decorative wristband. Simply measure the length around the intended wrist and add a suitable closure. The wave design creates a playful handmade texture that can look especially attractive when several colors are combined.
The pattern can also be transformed into a bag charm. Make a shorter strip of waves, finish the ends carefully, and attach a clasp. Light blue and white create a clean nautical-inspired appearance, while dark blue and cream can give the project a more classic handmade look. You can also add a small crocheted flower, heart, star, or other simple embellishment.
For home decoration, consider making a longer version of the Crochet Wave Stitch Pattern. Several repeating waves can become a decorative border for a blanket, pillow, basket, wall hanging, or fabric project. The technique can also be incorporated into larger crochet designs where a textured border is needed.
If your finished waves are not perfectly identical, do not consider that a failure. Handmade crochet naturally contains small variations, and those differences can give the project character. With practice, your stitch tension will become more consistent, and the waves will begin to look more uniform.
Most importantly, experiment with the pattern. Try different yarn colors, hook sizes, and wave lengths. The basic construction provides a starting point rather than limiting your creativity. Once you understand how the increases, decreases, and connecting stitches affect the shape, you can develop your own version of the Crochet Wave Stitch Pattern for many different handmade projects.
FAQ
What is a Crochet Wave Stitch Pattern?
A Crochet Wave Stitch Pattern is a decorative crochet technique that creates repeated curved or flowing shapes. The wave effect can be produced by changing stitch placement, using increases and decreases, varying stitch heights, or combining these techniques. The result is a textured pattern that can be used for accessories, borders, decorative pieces, and many other crochet projects.
Is the Crochet Wave Stitch Pattern suitable for beginners?
Yes. The pattern can be adapted for beginners because its basic construction can rely on familiar stitches such as chain stitch, slip stitch, single crochet, and simple increases or decreases. Beginners should practice one wave at a time before attempting a long continuous strip.
What yarn is best for this pattern?
Smooth cotton yarn is an excellent choice because it provides good stitch definition and makes the curves easy to see. Acrylic yarn can also work well, especially when softness is important. The most suitable yarn depends on the project and the desired final texture.
How do I make my crochet waves more defined?
Consistent tension is one of the most important factors. You can also make the wave more pronounced by adjusting the number and placement of increases or by using taller stitches in selected sections. Testing a small sample first is the easiest way to determine what works with your yarn and hook.
Can I use multiple colors in the Crochet Wave Stitch Pattern?
Absolutely. Multiple colors can make the individual waves stand out beautifully. Light blue, dark blue, and white, as shown in the inspiration design, create a soft coordinated palette. You can also experiment with pastel colors, neutral shades, or contrasting colors depending on your project.
Can I change the size of the waves?
Yes. To make larger waves, increase the length of the foundation section and adjust the shaping accordingly. For smaller waves, use fewer chains and fewer shaping stitches. It is a good idea to make a small sample whenever you change yarn or hook size.
Why are my waves curling too much?
Excessive curling can happen when the shaping contains too many increases or when the stitches are worked very tightly. Try reducing the number of increases, loosening your tension slightly, or using a larger hook. Blocking may also help with certain yarn fibers.
Can this pattern be used for a crochet keychain or bag charm?
Yes. A small Crochet Wave Stitch Pattern can make a charming keychain or bag charm. For these projects, use secure finishing techniques and attach the hardware to a reinforced portion of the crochet. A firm stitch structure is generally preferable for items that will be handled often.
How do I keep the waves looking even?
Count your stitches regularly and pay attention to the same shaping points in every wave. Consistent tension also makes a significant difference. If you are using multiple colors, try to maintain the same number of stitches in each color section.
Can I use this pattern as a border?
Yes. A repeated wave can become a decorative border for blankets, scarves, bags, pillows, baskets, and other crochet or fabric projects. You may need to modify the starting chain and repeat multiple wave sections to fit the length of the project.
Conclusion
The Crochet Wave Stitch Pattern is a creative technique that combines simple crochet principles with attractive curved shapes. In this tutorial, you learned how to prepare your materials, create a foundation chain, shape the rising and returning portions of a wave, connect multiple sections, change colors, and finish the project securely. The same basic idea can be adapted into small accessories, keychains, bag charms, bracelets, decorative trims, and larger crochet projects.
The blue and white color combination shown in the inspiration design demonstrates how effective color selection can make a simple stitch pattern stand out. With practice, you can experiment with different yarns, colors, stitch heights, and wave sizes to create a version that reflects your own style.
Remember that crochet improves through practice. Your first Crochet Wave Stitch Pattern may not look exactly like your final version, and that is completely normal. Focus on understanding the movement of the stitches, keeping your tension comfortable, and repeating the shaping consistently.
If you try this pattern, please leave your honest opinion and share your suggestions. Tell us which colors you used, what project you created, and whether you would like to see more crochet patterns and step-by-step tutorials like this one. Your ideas and feedback can inspire future projects and help other crochet enthusiasts discover new ways to enjoy handmade creativity.