
The Crochet Rosebud Stitch 3D is a stunning and intricate stitch that adds texture and elegance to any crochet project. This unique stitch creates small, raised rosebuds that give a three-dimensional effect, making it perfect for blankets, scarves, hats, and even decorative pieces. If you want to learn how to crochet this beautiful stitch and incorporate it into your creations, this guide will walk you through everything you need to know.
Crochet is an art that allows endless creativity, and the Crochet Rosebud Stitch 3D is a fantastic way to add charm to your work. With the right technique and a little practice, you can master this stitch and impress others with your skills. In this article, we will cover the basics, step-by-step instructions, and tips to perfect this technique.
Let’s dive into the world of Crochet Rosebud Stitch 3D and explore how you can create stunning textured designs with this delightful pattern!
1. What is the Crochet Rosebud Stitch 3D?
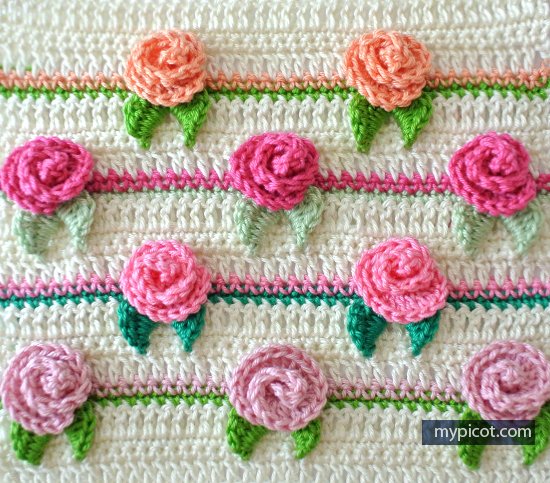
The Crochet Rosebud Stitch 3D is a unique stitch pattern that forms small rosebud-like shapes on the fabric’s surface. It is a combination of basic and advanced crochet techniques, resulting in a textured, floral design.
- This stitch is ideal for projects that require a soft and elegant touch.
- It can be used to create baby blankets, cardigans, cushion covers, and decorative wall hangings.
- The 3D effect is achieved by working loops and stitches in a specific sequence.
- Beginners may find it slightly challenging, but with patience, it becomes easier over time.
- Different yarn types can enhance or soften the 3D effect, depending on the desired look.
- It is an excellent choice for anyone looking to explore more intricate crochet patterns.
2. Materials Needed for the Crochet Rosebud Stitch 3D
Before starting, ensure you have the necessary materials to achieve the best results. Here’s what you’ll need:
- Yarn: Choose a soft, medium-weight yarn for a more pronounced 3D effect.
- Crochet Hook: A 4.0mm to 5.5mm hook is ideal, depending on your yarn choice.
- Scissors: To neatly trim excess yarn after completing the project.
- Tapestry Needle: For weaving in ends and finishing touches.
- Stitch Markers: Helpful for keeping track of stitch placement in complex patterns.
- Measuring Tape: Ensures your project meets the desired dimensions.
Having the right materials will make the process smoother and help you create well-defined rosebuds in your crochet projects.
3. Step-by-Step Guide to Crochet Rosebud Stitch 3D
Follow these steps to master the Crochet Rosebud Stitch 3D effectively:
- Step 1: Foundation Chain – Begin by making a foundation chain with an even number of stitches.
- Step 2: Base Row – Work single crochet stitches across the row to create a solid base.
- Step 3: Creating the Rosebud Stitches – Work a series of puff stitches or bobbles in a strategic manner to form the rosebud effect.
- Step 4: Spacing the Rosebuds – Leave a few rows of plain stitches between the rosebud rows to highlight the 3D texture.
- Step 5: Repeating the Pattern – Continue working the rosebuds in alternating rows to complete your fabric.
- Step 6: Finishing Touches – Once you reach the desired length, finish with a neat border to frame the pattern beautifully.
By following these steps, you can create a visually stunning crochet piece featuring raised, delicate rosebuds.
4. Tips and Tricks for Perfecting the Crochet Rosebud Stitch 3D
Improving your technique and avoiding common mistakes can make your Crochet Rosebud Stitch 3D projects more polished.
- Maintain Even Tension – Keep your stitches uniform for a consistent and professional look.
- Use High-Quality Yarn – A soft, smooth yarn will enhance the 3D effect and make the stitches stand out.
- Practice on a Small Sample – Before starting a large project, practice on a swatch to get comfortable with the pattern.
- Count Your Stitches – Always count your stitches at the end of each row to prevent mistakes.
- Experiment with Colors – Different color combinations can make the rosebuds pop and add a unique touch.
- Block Your Work – Gently steam or block your crochet piece to define the texture and keep it in shape.
With these helpful tips, you’ll be able to master the Crochet Rosebud Stitch 3D and create breathtaking projects effortlessly.
FAQ About Crochet Rosebud Stitch 3D
Q1: Is the Crochet Rosebud Stitch 3D suitable for beginners?
Yes, but it may require some practice. Beginners should start with basic stitches before attempting this technique.
Q2: What type of projects can I make using this stitch?
You can create blankets, scarves, hats, cardigans, cushion covers, and more using this stitch.
Q3: Can I use different yarn weights for this stitch?
Yes, but a medium-weight yarn works best to maintain the 3D effect.
Q4: How do I prevent my rosebuds from becoming too tight?
Maintain even tension and use a slightly larger hook if needed to create a looser, more defined shape.
Q5: Can I use this stitch for clothing items?
Yes! The stitch adds a beautiful texture to cardigans, shawls, and sweaters.
PATTTERN HERE
The Crochet Rosebud Stitch 3D is a mesmerizing and intricate pattern that adds charm and elegance to crochet projects. Whether you’re making decorative pieces or wearable items, this stitch provides a stunning 3D effect that makes your work stand out. With the right materials, techniques, and a bit of practice, you can master this stitch and use it in various creative ways.
Have you tried the Crochet Rosebud Stitch 3D before? Share your experience, feedback, and suggestions in the comments! We’d love to hear your thoughts and see your beautiful creations.