
The Fruity Baby Turtles Crochet Pattern is one of the most delightful and creative ways to combine vibrant colors, adorable designs, and the timeless art of crochet into a single project. From the very first stitch, this pattern invites crafters into a playful world where tiny turtles are inspired by fruity themes, making them perfect for gifts, decor, or even small business creations. Whether you are a beginner or an experienced crocheter, this pattern offers a satisfying and enjoyable experience that keeps you engaged from start to finish.
Crochet enthusiasts are always searching for fresh and unique ideas, and the Fruity Baby Turtles Crochet Pattern stands out as a charming and trendy option. The combination of soft yarns, bright tones, and imaginative designs allows you to create turtles that resemble fruits like strawberries, watermelons, and pineapples. This not only makes your finished pieces eye-catching but also adds a fun twist that appeals to both children and adults. It’s a creative way to expand your crochet skills while producing something truly memorable.
Another reason why the Fruity Baby Turtles Crochet Pattern has gained popularity is its versatility. These tiny turtles can be used as keychains, nursery decorations, toys, or even collectibles. They are small enough to complete quickly but detailed enough to feel like a rewarding project. By using this pattern, you can explore different color combinations, textures, and finishing techniques, making each turtle unique and full of personality.
Understanding the Basics of the Fruity Baby Turtles Crochet Pattern
The foundation of the Fruity Baby Turtles Crochet Pattern lies in mastering basic crochet stitches such as single crochet, increases, and decreases. These stitches form the structure of the turtle’s body and shell. Even beginners can follow along with a bit of practice and patience.
Choosing the right yarn is essential for achieving the best results. Soft cotton or acrylic yarns work well for this pattern, as they provide durability and a smooth finish. Bright and fruity colors are key to bringing the turtles to life.
Hook size also plays a crucial role in your project. A smaller hook helps create tighter stitches, which is important for amigurumi-style crochet. This ensures that the stuffing stays inside and the shape remains firm.
Understanding stitch markers can greatly improve your workflow. They help you keep track of rounds, especially when working in continuous spirals, which is common in this type of pattern.
Consistency in tension is another important factor. Keeping your stitches even will result in a more polished and professional-looking turtle. Practice helps you maintain this consistency.
Finally, reading and interpreting the pattern correctly is vital. Take your time to understand abbreviations and instructions before starting, as this will prevent mistakes later on.
Creative Color Combinations and Fruity Inspirations
One of the most exciting aspects of the Fruity Baby Turtles Crochet Pattern is experimenting with color combinations. You can let your imagination run wild by choosing shades that resemble your favorite fruits.
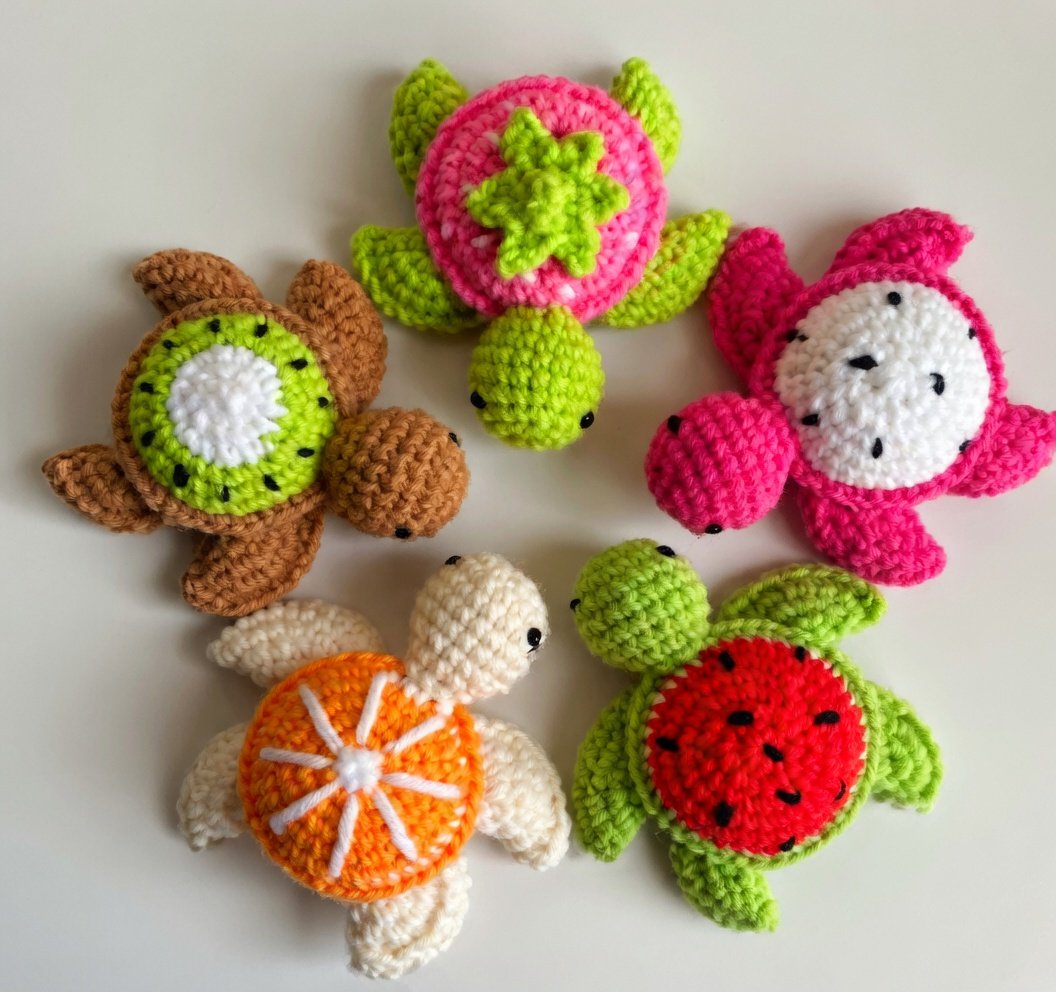
For a strawberry-inspired turtle, use red for the shell and green for the top. Adding small white stitches can mimic seeds, enhancing the realistic effect.
A watermelon turtle can feature a green outer shell with a pink center and tiny black seed details. This combination is vibrant and instantly recognizable.
If you prefer tropical vibes, a pineapple-inspired turtle with yellow and green tones can be a fantastic option. The textured shell can mimic the fruit’s unique surface.
Mixing unexpected colors can also create a playful and modern look. Pastel tones or rainbow combinations can give your turtles a whimsical touch.
Color transitions and striping techniques can add depth and interest to your design. This makes each turtle visually dynamic and unique.
Ultimately, the color choices you make will define the personality of your turtle, making the Fruity Baby Turtles Crochet Pattern a highly customizable project.
Step-by-Step Process to Create Your Crochet Turtles
Starting your Fruity Baby Turtles Crochet Pattern project begins with creating a magic ring. This forms the center of the turtle and allows you to build outward in rounds.
Next, you will increase stitches gradually to shape the body. This step is crucial for achieving the rounded form typical of baby turtles.
Once the base is complete, you can begin working on the shell. This is where your fruity design comes into play, using color changes and textures.
The head, legs, and tail are usually crocheted separately. These small parts add character and dimension to your finished turtle.
After completing all pieces, assembly becomes the focus. Carefully sew each part onto the body, ensuring symmetry and balance.
Finally, stuffing and finishing touches bring your turtle to life. Make sure to stuff evenly and secure all ends properly for durability.
Tips for Perfecting Your Fruity Baby Turtles Crochet Pattern
To truly master the Fruity Baby Turtles Crochet Pattern, attention to detail is essential. Small adjustments can make a big difference in the final result.
Always use high-quality stuffing to maintain the shape of your turtles. This ensures they remain soft yet structured over time.
Take your time when sewing pieces together. Neat and secure stitching will enhance the overall appearance and longevity of your project.
Experiment with different yarn textures to add variety. Some yarns can give your turtles a fuzzy or glossy finish, adding extra charm.
Practice makes perfect, especially when it comes to tension and stitch consistency. Don’t be discouraged if your first attempt isn’t perfect.
Lastly, enjoy the process. The Fruity Baby Turtles Crochet Pattern is meant to be fun and creative, so allow yourself to explore and innovate.
FAQ About Fruity Baby Turtles Crochet Pattern
What skill level is required for the Fruity Baby Turtles Crochet Pattern
This pattern is suitable for beginners with basic crochet knowledge, but it also offers enough creativity to engage intermediate and advanced crafters.
What materials do I need to start
You will need yarn in various colors, a crochet hook, stuffing, a yarn needle, and stitch markers to complete your turtles.
How long does it take to finish one turtle
Depending on your experience, it can take anywhere from one to three hours to complete a single turtle.
Can I sell items made from this pattern
Yes, handmade items created using the Fruity Baby Turtles Crochet Pattern are often popular in craft markets and online shops.
What type of yarn works best
Cotton and acrylic yarns are commonly recommended because they are durable and easy to work with.
How can I make my turtles look more realistic
Adding small details like embroidered seeds, textured stitches, and careful color choices can enhance realism.
Is this pattern suitable for children’s toys
Yes, but ensure all parts are securely attached and avoid small detachable pieces for safety.
Can I customize the size of the turtles
Absolutely, you can adjust the yarn weight and hook size to create larger or smaller turtles.
The Fruity Baby Turtles Crochet Pattern is a joyful and creative project that combines color, technique, and imagination into a delightful crochet experience. Throughout this article, we explored the basics of the pattern, creative color inspirations, step-by-step guidance, and essential tips to help you achieve beautiful results. Whether you are crafting for fun, gifting, or even selling your creations, these adorable turtles offer endless possibilities for customization and expression.
.