
The fish quilt pattern is a charming and creative way to bring a touch of the ocean into your quilting projects. Whether you are a beginner exploring your first designs or an experienced quilter looking to try something fresh, this pattern offers endless possibilities for creativity and personalization. From playful, colorful fish blocks to elegant, minimalist designs, the versatility of this theme makes it a favorite among quilting enthusiasts.
One of the reasons the fish quilt pattern stands out is its ability to adapt to different styles and purposes. You can create quilts for children’s rooms, beach-themed home décor, or even artistic wall hangings. The use of bold colors, textured fabrics, and imaginative layouts allows quilters to express their unique vision while still following a structured pattern. Additionally, this theme is perfect for using fabric scraps, making it both budget-friendly and sustainable.
In this guide, you will learn everything you need to know about the fish quilt pattern, including design ideas, essential techniques, fabric choices, and tips for achieving professional results. By the end of this article, you will feel confident starting your own project and bringing your aquatic-inspired quilt to life.
Understanding the Basics of the Fish Quilt Pattern
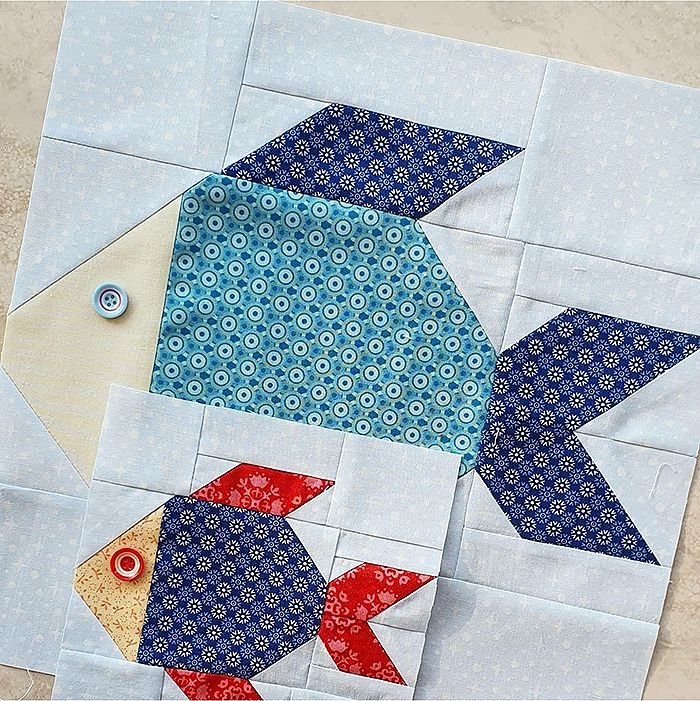
The fish quilt pattern typically consists of repeated fish-shaped blocks arranged in rows or creative layouts. Each block can be identical or slightly different, depending on the design you choose. This flexibility allows you to experiment with colors, sizes, and fabric combinations to achieve a unique look.
When starting a fish quilt pattern, it is important to select the right template or block design. Some patterns feature simple geometric fish shapes, while others include detailed fins, scales, and tails. Beginners may prefer basic designs, while advanced quilters can explore more intricate patterns.
Fabric selection plays a crucial role in the success of your quilt. Bright, vibrant colors often work well for fish designs, as they mimic the lively hues found in marine life. However, softer tones can also create a calming and elegant effect.
Another key element is the background fabric. Choosing a contrasting background helps the fish shapes stand out, enhancing the overall visual impact of the quilt. Common choices include blues to represent water or neutral tones for a modern look.
Cutting and piecing accuracy is essential when working with a fish quilt pattern. Precise measurements ensure that all blocks align correctly, resulting in a polished final product. Taking your time during this step can make a significant difference.
Finally, understanding the layout of your quilt is important. You can arrange fish blocks in straight rows, create a swirling ocean effect, or even design a scene with varying fish sizes and directions.
Choosing Fabrics and Colors for a Stunning Fish Quilt Pattern
Selecting the right fabrics is one of the most exciting parts of creating a fish quilt pattern. The combination of colors and textures can completely transform the look and feel of your quilt.
Cotton fabrics are the most commonly used material for quilting due to their durability and ease of handling. They come in a wide range of prints and colors, making them ideal for fish-themed designs.
Consider using patterned fabrics to add depth and interest to your fish blocks. Stripes, polka dots, and even batik prints can mimic the natural textures found in fish scales and ocean environments.
Color coordination is essential for achieving a cohesive design. You can choose a monochromatic palette for a sophisticated look or a rainbow palette for a playful and vibrant quilt.
Don’t forget about contrast. Using light and dark fabrics strategically will help define the shapes in your fish quilt pattern and make each block stand out.
Incorporating scrap fabrics is another great option. This approach not only reduces waste but also adds a unique, patchwork charm to your quilt.
Lastly, think about the emotional tone you want your quilt to convey. Bright colors can create a cheerful and energetic vibe, while muted tones can evoke calmness and serenity.
Step-by-Step Techniques to Create a Fish Quilt Pattern
Creating a fish quilt pattern involves several steps, each requiring attention to detail and patience. Following a structured approach will help you achieve the best results.
Start by preparing your materials, including fabric, thread, rotary cutter, and quilting ruler. Having everything ready will make the process smoother and more enjoyable.
Next, cut your fabric pieces according to your chosen pattern. Accuracy is crucial here, as uneven pieces can lead to misaligned blocks later on.
Begin assembling your fish blocks by sewing the individual pieces together. Use a consistent seam allowance to ensure uniformity across all blocks.
Press your seams carefully after each step. Proper pressing helps your quilt lay flat and gives it a professional finish.
Once all blocks are complete, arrange them on a flat surface to plan your layout. This step allows you to experiment with different arrangements before sewing everything together.
Finally, sew the blocks into rows and then join the rows to complete the quilt top. Add batting and backing, then quilt and bind your project to finish your fish quilt pattern.
Creative Ideas and Variations for Fish Quilt Patterns
The fish quilt pattern offers endless opportunities for creativity and personalization. By experimenting with different techniques, you can create a truly unique piece.
One popular variation is the appliqué method, where fish shapes are sewn onto a background fabric. This technique allows for more detailed and intricate designs.
Another idea is to create a 3D effect by adding textured fabrics or embellishments. This can make your fish appear more lifelike and visually interesting.
You can also experiment with different quilt sizes. Small fish blocks work well for baby quilts, while larger blocks are ideal for throws and bed quilts.
Adding borders and sashing can enhance the overall design of your quilt. These elements help frame your fish blocks and provide a polished look.
Consider incorporating other ocean-themed elements, such as waves, bubbles, or seaweed, to create a complete underwater scene.
Lastly, don’t be afraid to mix and match styles. Combining modern and traditional techniques can result in a one-of-a-kind fish quilt pattern that reflects your personal style.
FAQ About Fish Quilt Pattern
What is a fish quilt pattern?
A fish quilt pattern is a quilting design that features fish shapes as the main motif, often arranged in repeating blocks or creative layouts.
Is the fish quilt pattern suitable for beginners?
Yes, many fish quilt pattern designs are beginner-friendly, especially those with simple shapes and minimal piecing.
What fabrics work best for a fish quilt pattern?
Cotton fabrics are ideal due to their durability and ease of use, but you can also experiment with textured or patterned fabrics.
How long does it take to complete a fish quilt pattern?
The time required depends on the complexity of the design and your skill level, but most projects can be completed within a few days to a few weeks.
Can I customize my fish quilt pattern?
Absolutely! The fish quilt pattern is highly versatile, allowing you to experiment with colors, sizes, and layouts.
Do I need special tools for a fish quilt pattern?
Basic quilting tools such as a rotary cutter, ruler, and sewing machine are usually sufficient.
The fish quilt pattern is a delightful and versatile project that allows quilters to explore creativity while developing essential skills. Throughout this article, you learned about the basics of the pattern, how to choose the right fabrics, step-by-step construction techniques, and creative variations to make your quilt unique.
By applying these tips and techniques, you can confidently start your own fish quilt pattern project and create something truly special. Quilting is not just about the final product but also about the joy of the process and the satisfaction of bringing your ideas to life.
Now it’s your turn—try creating your own design and see how your creativity flows. Don’t forget to share your honest opinion and leave suggestions about your experience. Your feedback can inspire others and help improve future projects!