
Learning how to sew a quilted makeup bag can be a fun and rewarding project for both beginners and experienced sewists. This type of craft combines basic sewing skills with the creativity of quilting, resulting in a functional and personalized accessory that makes a great gift or a stylish addition to your everyday essentials.
Creating a quilted makeup bag offers more than just practicality. The soft padding protects your beauty products while the beautiful design allows for endless customization.
You can choose fabrics that reflect your personality, add embellishments, and make the bag truly one-of-a-kind. Plus, it’s an eco-friendly alternative to buying plastic cosmetic pouches.
In this article, we’ll walk through every step of the process—from selecting the right materials to assembling and finishing your makeup bag. Whether you’re crafting for yourself, making gifts, or even thinking about starting a small handmade business, knowing how to sew a quilted makeup bag is a skill worth mastering.
1. Choosing the Right Materials
Selecting high-quality materials is the foundation of sewing a quilted makeup bag that lasts. Start with 100% cotton fabric, which is easy to quilt and holds its shape well. Choose two fabric pieces—one for the outer shell and one for the lining. Coordinating colors or fun patterns can make your bag stand out.
Batting is the fluffy middle layer that gives the makeup bag its quilted texture and padded protection. Cotton or polyester batting works well, depending on your preference. Thin batting will create a sleek look, while thicker batting provides more cushion.
A nylon or metal zipper is essential for closing the bag securely. Make sure to get a zipper that’s a few inches longer than the bag’s top edge. This allows you to trim and customize the fit easily when assembling.
Use quilting thread for added strength and visual interest. You can match the thread color to your fabric for a subtle finish or use contrasting thread for decorative quilting lines that pop.
Other useful materials include sewing clips, a rotary cutter, and a quilting ruler for precision. A walking foot on your sewing machine is helpful for handling layered fabric and batting without shifting.
Before you start sewing, make sure to pre-wash your fabrics. This prevents shrinkage later on and helps keep your makeup bag looking fresh even after washing.
2. Preparing and Quilting the Fabric
Begin by cutting out your fabric and batting into rectangles of equal size. A common size for a quilted makeup bag is 10” x 8”, but you can adjust based on your needs. Cut one piece each of outer fabric, lining fabric, and batting.
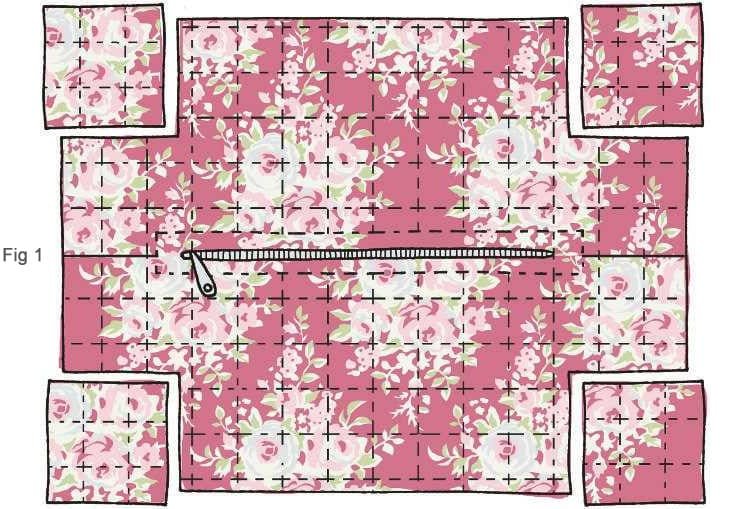
Layer the outer fabric on top of the batting, right side up. Use sewing clips or pins to hold them in place. Then, mark quilting lines using a fabric-safe chalk or pen. Diagonal lines spaced 1 inch apart are classic and easy for beginners.
Sew along the marked lines using a walking foot and a straight stitch. This is the quilting process that secures the batting to the outer fabric, giving your makeup bag its signature texture. Backstitch at the beginning and end of each line for durability.
Once the quilting is complete, trim the edges so all layers are even. This ensures a neat finish when you sew the rest of the bag together. Make sure everything aligns properly before proceeding.
Repeat the same steps with the lining fabric if you want a quilted interior. However, for a simpler version, you can use the lining fabric without quilting it. This still results in a professional-looking bag while saving time.
Iron all fabric pieces flat before moving forward. A crisp, smooth fabric surface helps your seams stay straight and neat during assembly. Don’t skip this step—it makes a big difference in the final product.

3. Assembling the Bag
Now that your fabric is quilted and trimmed, it’s time to assemble the makeup bag. Start by installing the zipper. Place it face down along the top edge of the quilted fabric and layer the lining on top, right sides facing. Use clips to hold the layers together.
Sew along the top edge using a zipper foot. Once done, flip the fabric so the right sides are out and topstitch near the zipper for a clean, finished look. Repeat the process with the other side of the zipper and remaining fabric pieces.
Next, open the zipper halfway (this is important!) and align the outer fabric pieces together, right sides facing, and do the same with the lining. Pin or clip everything in place, leaving a 3-inch opening at the bottom of the lining for turning.
Sew all around the edges with a ¼” seam allowance. When you reach the corners, pivot the needle for smooth transitions. Backstitch at the beginning and end for added strength.
To give your makeup bag a boxy shape, pinch each bottom corner into a triangle and sew straight across about 1.5 inches from the tip. Cut off the triangle to reduce bulk. Repeat this step for all four corners—outer and lining.
Turn the bag right side out through the lining hole. Push out all the corners carefully, then sew the lining hole shut using a small hand stitch or machine stitch. Tuck the lining inside the outer bag neatly.
4. Customizing and Finishing Touches
Now that you know how to sew a quilted makeup bag, it’s time to get creative with personalization. Add a fabric label, embroidery, or iron-on vinyl to customize your makeup bag with a name or monogram. These details add charm and make your bag unique.
Decorative ribbon or trim along the zipper edge or bottom seam can enhance the look. Choose colors and textures that complement your fabric selection. Just be sure to attach them securely during the final topstitching phase.
Consider sewing in small interior pockets using scraps of lining fabric. These pockets can help keep items organized inside the bag, making it even more functional for daily use or travel.
If you want more structure, you can use fusible interfacing on the outer fabric instead of batting. This gives a stiffer shape and works well for those who prefer a more polished, professional finish.
Experiment with different shapes and sizes. From flat pouches to rounded or gusseted styles, the possibilities are endless. Once you master the basics, you can adapt the pattern to fit brushes, travel toiletries, or even tech accessories.
Lastly, take time to press your finished makeup bag carefully. This gives it a crisp, store-bought look and helps smooth out any wrinkles from the sewing process. Your bag is now ready to use or gift proudly!
FAQ
What is the best fabric for sewing a quilted makeup bag?
100% cotton is highly recommended for its durability, easy handling, and wide variety of prints. It also quilts beautifully and is machine washable.
Can I sew a quilted makeup bag by hand?
Yes, although it takes more time and effort. Hand quilting and stitching can add a personal touch, especially for smaller bags.
How do I wash a quilted makeup bag?
Use a gentle machine cycle or hand wash with mild detergent. Air dry and press with a warm iron to maintain its shape and appearance.
Do I need a sewing machine with a walking foot?
A walking foot helps feed layers evenly, which is useful when quilting. While it’s not absolutely necessary, it does make the process easier and more precise.
What size zipper should I use?
A zipper slightly longer than the bag width (e.g., 12” zipper for a 10” wide bag) gives you room to adjust and finish edges neatly.
Can I sell quilted makeup bags I make?
Absolutely! Handmade quilted makeup bags are popular items at craft fairs and online shops. Just ensure you use original or licensed fabric designs for commercial use.
PATTERN HERE
Now you’ve learned how to sew a quilted makeup bag from start to finish. We’ve covered everything from selecting the right materials, quilting techniques, bag assembly, and ways to add personal flair. Whether you’re making a gift or launching your own handmade business, this project is both enjoyable and rewarding.
We’d love to hear from you! Leave a sincere opinion below and share your suggestions or tips for sewing quilted makeup bags. Your feedback helps us improve and continue providing valuable, creative content. Happy sewing!